Ok, so while I am trying to finish my Quilt Studio up... I have also been looking at blogs. Look what I found. It's a blog for blog giveaways! How neat. So go sign up and see if you can win some of this stuff!
Blog GiveAways
Wednesday, March 30, 2011
Monday, March 28, 2011
Who doesn't like a Giveaway?
This-n-That Fabrics is having a GiveAway.... and it's JellyRolls. Oh how I love Jelly Rolls! There are various ways to get entries so make sure you stop by and check it out. I mean, you COULD be the next winner of a JellyRoll! Doesn't that sound exciting?
So stop on by This-N-That Fabrics for a chance to win.
And for those of you who love making those cute little mug rugs, they are also having a MugRug contest. So click on the cute little MugRug button and get over there and enter. The contest will run from March 6 until April 30th.

So stop on by This-N-That Fabrics for a chance to win.
And for those of you who love making those cute little mug rugs, they are also having a MugRug contest. So click on the cute little MugRug button and get over there and enter. The contest will run from March 6 until April 30th.
Tuesday, March 22, 2011
On with the organizing
So... I got my new Janome Horizon 7700 QCP the end of January. I have made one thing using my machine since.... cause I had this bright idea to organize my new quilt room and put myself on restriction until I get it done. Well... ok... that's been so hard for me. I'm still not finished and it's already the end of March! I still have a big bin of Batiks to fold over those coroplast boards.... and lets not talk about the closet... but that's not just fabrics.. I have a few bins in there with festival things in it. So, maybe I will get to the end of my folding very soon. I am sure hoping so! I've emptied about 5 bins so far.
So lets take a peek at what's been done since I last updated yall!
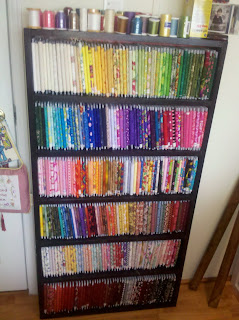
Here is the FQ Shelf and it's so full, I can't get another on the shelf.
And here is my new ironing table. My husband made me this very pretty ironing board. I'm all set for an ironing station now.


So lets take a peek at what's been done since I last updated yall!
Here is the FQ Shelf and it's so full, I can't get another on the shelf.

And here is my new ironing table. My husband made me this very pretty ironing board. I'm all set for an ironing station now.

And all the tools will be located just above the ironing station.
Oh and nevermind the wires coming from the little shelf there. My Router happens to be in my room, so I had to put it somewhere.

And here is my CQ Bins... full of lace, ribbon etc...

Room is a wreck as you can see.... Still on restriction!!! lol

Sunday, March 20, 2011
Had to buy another shelving unit
Started filling up my other shelf and decided since these things are so cheap, I just as well buy another one. So I did. And today, instead of asking my husband to put it together, guess who did it? ME! I was so proud I was able to follow directions and do it. Although the directions said it would take only an hour to do this, it must have taken me at least 3. But who's counting right? lol


And here it is! Sorta dark, but I'll post more once I get the room pretty much done.

I'm still not finished folding fabric. Ran out of coroplast again. We'll order more on Monday. Boy this has become expensive... but I am doing it along and along like I said cause I wouldn't be able to afford it. I still need to make curtains, or a cornice for the window, make a border in red, white and black out of vinyl to put on, and... finish folding fabric!!! Can't wait till it's done!

Here is what it looks like! Well, here is the pic of it on the box, lol.

And here is a pic of the unit as I'm putting it together. Boy I learned how to take out these screws like I use a seam ripper to take out quilt stitches, LOL.

And here it is! Sorta dark, but I'll post more once I get the room pretty much done.

Here is my Peg Board with a bunch of my rulers on it. I actually found more tonight.... I'll either keep those in a drawer or I will find a place on this peg board for them.
Chris also got my drawers fixed today with the exception of putting knobs on.
I'm still not finished folding fabric. Ran out of coroplast again. We'll order more on Monday. Boy this has become expensive... but I am doing it along and along like I said cause I wouldn't be able to afford it. I still need to make curtains, or a cornice for the window, make a border in red, white and black out of vinyl to put on, and... finish folding fabric!!! Can't wait till it's done!
Monday, March 14, 2011
Clay Projects I am working on
I have been taking some Pinch Pot lessons from a lady named Joanna Angel. She is such a talented artist and I've really enjoyed looking at her work. She has some of the prettiest pieces I've ever seen . I so much admire her creative abilities. I did not do so well in her class. The first pot I made turned out terrible and I thought I could have thrown it in the trash, lol. It was supposed to be a pot... but mine turned out to be a round dish of some sort. I still have to put some final glaze on those two bowls I did with Joanna. So I bought some clay myself so I could play at home.We will be getting our wheel off of layaway in less than 2 weeks now :) Austin, Taylor and myself made a few things. I made a nice bowl finally. Taylor made a bowl which looked like a trinket box and Austin made a cup and put Joe on the side of it, lol. We had a great time doing this.


Austins First Clay Project. He really enjoyed it. We watched a video on YouTube to learn how to make a mug. This is his first little bowl as well. I thought it was funny how he put Joe on the side. He said he was making this for his daddy, lol

This is Taylor's first pinch pot project. She made what I thought looked like a trinket bowl. She had fun and kept telling me she didn't need anyone to show her how. I told her, oh well... go ahead and make what you want. I think she did a great job!

This is my first pinch pot that I did at home. Took lessons and made two there and this one here at home. This one turned out so much better than the rest. So much fun.

My first Mug, done from watching the YouTube video. This was alot of fun to do.

This is Chris's first clay project. You couldn't show him how to do anything either. The first thing he said was (when I was trying to show him how to make a pinch pot) "I don't need you to tell me how to make a pot, I know how to". So much for me taking classes and showing my family huh? lol So this is what he made. Turned out great!

Here is my bowl after I put the red under glaze on the outside, although it looks pink! I also added black dots to it.

Another pic of the bowl... here I added a green under glaze to it
.

As you can see, I have no underglaze inside yet,

This is after I added the black under glaze to the bowl.

Closeup of the bowl after putting on black under glaze.

By now, I surely have enough under glaze colors, don't you think? lol

But.... I didn't quit... and here is my final under glazing. It's ready for it's first firing. I'm hoping I did everything right. Stay tuned, lol

And here is the Vase I made 2 nights ago.

After it dried a little bit, I took this heart button I had and I pressed the button into my clay vase. I can't wait to put under glaze on the hearts and then I will fire it and add more underglaze and fire it and then put the final over glaze on it. It should turn out pretty. Stay tuned!
Saturday, March 12, 2011
Track Lights
Today my dh put in my track lights. I don't have a really good pic of them as the pic looks blurry, but I'll try and take a better one later. I like them , but they are not bright enough using 60 watt bulbs. I will have to most likely put in 100 watt bulbs. I think after that, I will be set to go for lighting. I like the fact you can move them around if you need to.

Yea, not a good pic of them, so I will have to get another one.

Yea, not a good pic of them, so I will have to get another one.
Friday, March 11, 2011
Thread Cabinet
I was shopping in a consignment shop one day recently and I came upon this cute little shelf I thought would go perfectly in my room. I will be putting some of my thread in this cabinet. I know all of them won't fit, but that's ok, I'll put some of my best thread in it.

Sorry the pic is a little blurry, but isn't that the cutest little shelf you ever seen? I can't wait to get it hung up and put my threads in it. It was all brown like the wood, but my DH painted it all red for me, except the inside. I love it!

Sorry the pic is a little blurry, but isn't that the cutest little shelf you ever seen? I can't wait to get it hung up and put my threads in it. It was all brown like the wood, but my DH painted it all red for me, except the inside. I love it!
Tuesday, March 8, 2011
More FQ's???
Really now.... I must have folded over 100 FQ's this evening. I looked around and here is what I found.


This just so happens to be a box of Birthday FQ's from the HGTV Boards. I was in the Birthday Swap in 2006. Still in a box.... boy was I in need of de-cluttering. 5 years is a long time to stay in a box, especially Fabric, right?
Sunday, March 6, 2011
My Fat Quarter Shelf
Well, I had been at my husband about building me a Fat Quarter shelf so I could get the FQ's out of the bins. So yesterday he built me one from my specifications. He told me it was not going to be big enough but for some reason I thought it would be.

Here they are... all primed up! Was trying to decide which colors I wanted to go with in my room, although the other shelf is black and red.

Well... when I awoke this afternoon after going back to bed (cause I woke up at 6am and had not gone to bed until 2:30) I found my FQ Shelf all painted. He made the decision to paint it like the other one, which is fine. Here it is, and it has FQ's in it already. Not arranged really good but some are arranged.

Well, I'm on my way to getting my FQ's arranged on a shelf. I took these off the big shelf, but looks like I am going to have to put some FQ's back on that big shelf. This is just too small. Hubby got frustrated with me over this but... How's a girl supposed to know how much FQ's she has when they are in bins? That's why I need shelves now, so I can see them, hehe.
Hoping after all the folding is over I will have enough room to shop for more fabric. I'll just have to be creative in order to store some more, right?
Saturday, March 5, 2011
My Messy Quilt Studio and new Table for my Horizon
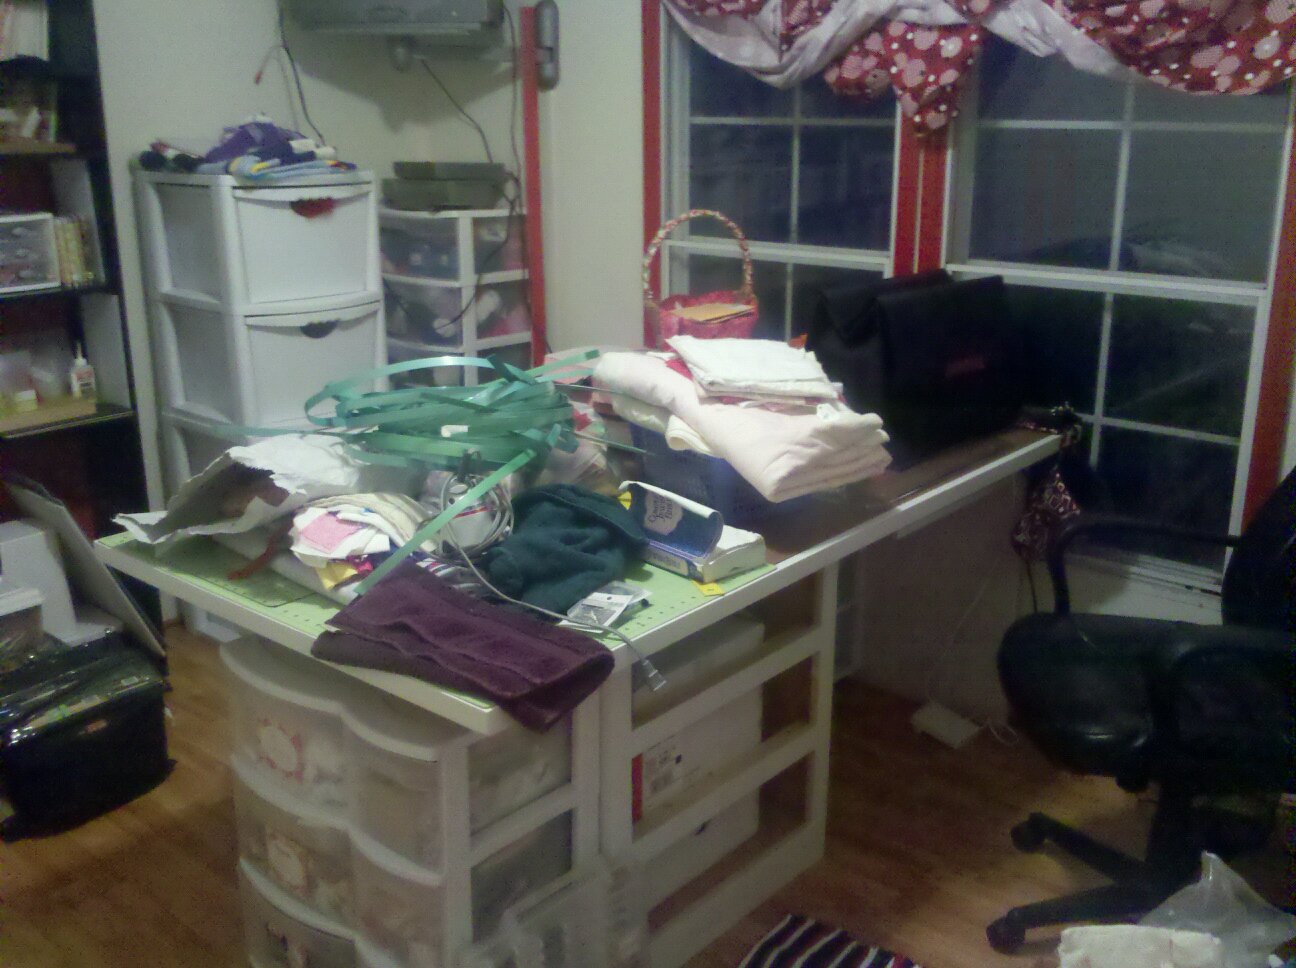
So now that I have my new machine, I've had a hard time going into my sewing room to sew. I have bins of fabric everywhere, although you won't see the bins in the pictures, I have since then moved them in there as I prepare to fold each one of my FQ's and my yardage into small like books, with the help of Coroplast material. I seen this done by a lady on "The Quilting Board" and since we run a sign shop, it's easily accessible, but I can tell you it is by far the cheapest thing to use. What I do like about it though is it is very sturdy and you can wrap a lot of fabric around them. Here are some pics of my messy room! I hope it's soon organized so I can get in here and sew. I am missing it so much! Also some pics of my new table.


One of the messy corners in the room.

So messy I have it even coming out the closets :(

Table is finally cleaned off, getting ready for it to be taken out.

Messy Closet!

Another part of the messy closet. See all those bins I have to go through? Some of it though have T-shirts in them, some have crafting items in them from a festival we did... had alot of things left over.

And more boxes and bins

I even have a soap kettle in here and I don't think I've ever used it yet, lol. I will someday though.

Woo Hoo.... a Table top for my Horizon, in the works :)

Working on the drawers to go in the cabinet of my Sewing Table.

Lots of painting going on here :)


And finally, Ethel has a Table of her own to sit down in :) Table top is on order.

The new table is turned a different way, I will have room on both sides of this table this time. The measurements on my new table are 3'x6'. See, I already have a mess all over it. It's gonna be like that until I am finished folding fabric.


See this 4'x8' Table here in my quilting studio? It's just way too big for my room. See under it? I had so many bins of fabric under this table. I know, you might say, out of site, out of mind, but even if I put a small curtain up there, I would still know what a mess it looked like. And... how aggravating it is to go look for fabric. I need to see what I have :)

This room is a complete mess right now. Cleaned the table off cause I am getting a new table for my Janome Horizon 7700QCP and hoping with the new table being smaller and turned a different way, it will look better in the room.

One of the messy corners in the room.

So messy I have it even coming out the closets :(

Table is finally cleaned off, getting ready for it to be taken out.

Messy Closet!

Another part of the messy closet. See all those bins I have to go through? Some of it though have T-shirts in them, some have crafting items in them from a festival we did... had alot of things left over.

And more boxes and bins

I even have a soap kettle in here and I don't think I've ever used it yet, lol. I will someday though.

Woo Hoo.... a Table top for my Horizon, in the works :)

Working on the drawers to go in the cabinet of my Sewing Table.

Lots of painting going on here :)

This is the base to my cabinet the drawers are gonna fit in to.

And finally, Ethel has a Table of her own to sit down in :) Table top is on order.
The new table is turned a different way, I will have room on both sides of this table this time. The measurements on my new table are 3'x6'. See, I already have a mess all over it. It's gonna be like that until I am finished folding fabric.

If you look closely you can see some of the fabric which has been folded to look like books on the shelf. Right now I have alot of things on that shelf which are just sitting there until I figure out what I am going to do with everything.
My baby is here :)
Our tax check arrived and my hubby took me to the local Janome dealer and bought me a Horizon 7700 QCP. When it came in, I was so excited!! I unpacked it and couldn't wait to get started viewing the videos. There are many videos on the DVD but there are also some really good ones on the Janome Website, so you are never in the dark as to how to operate the machine, nor how to use the many stitches it came with. Here are some pics of it.

Here it is! Still not even out of the plastic yet. I have named her Ethel after my grandmother who used to sew my clothing. I loved her so much and I miss her very much. She died before I started to sew, so she would have been so honored to know I named my precious machine after her. And... if she were living today, what fun her and I could have had on this machine.
I'm so happy I have it. I've never owned an expensive machine before. Thank you sweet darling husband for this wonderful machine :)


Here is another pic of some of the stitches it has available.

And... the last pic of the remaining stitches.

Taylor is taking a look at the machine here. YES it's really big Taylor...and so different than my Brother 6000ie which I loved, but didn't have enough quilting space.


Here it is! Still not even out of the plastic yet. I have named her Ethel after my grandmother who used to sew my clothing. I loved her so much and I miss her very much. She died before I started to sew, so she would have been so honored to know I named my precious machine after her. And... if she were living today, what fun her and I could have had on this machine.
I'm so happy I have it. I've never owned an expensive machine before. Thank you sweet darling husband for this wonderful machine :)

This is the top of the machine. It flips open to reveal all the stitches as well as the thread holder and a compartment for the feet. How neat is that? It has so many many stitches.

Here is another pic of some of the stitches it has available.

And... the last pic of the remaining stitches.

Taylor is taking a look at the machine here. YES it's really big Taylor...and so different than my Brother 6000ie which I loved, but didn't have enough quilting space.

Here is a pic of the compartment on the bottom of the machine which holds some more feet. Gotta love it!
Subscribe to:
Posts (Atom)